12 Christmas Outdoor Lights Ideas
Outdoor Christmas lights are the first thing people see, and they do not have to be complicated or expensive to look wonderful. A single strand of warm white lights along the roofline does more than a yard full of mismatched decorations, and most of the ideas in this list cost between $20 and $80 in lights and supplies. LED strings are the standard now: a 25-foot strand costs about $8 to $15, uses very little electricity and stays cool to the touch, which makes them safer around dry leaves and wooden trim. Running a typical LED display for six hours a night for a month costs roughly $2 to $5 in electricity, so the running cost is almost nothing compared with the price of the lights themselves. Old incandescent strands cost far more to run and get hot, so if you still have them in a box, this is the year to replace them.
Before you buy anything, walk around your house at dusk and decide where the lights should go. The roofline, the front door and the walkway are the three places that matter most, because they frame the house and guide visitors to the door. Measure each run with a tape measure or a length of string, add about 10 percent extra for slack and corners, and count your outdoor outlets — most houses have one or two, so plan for extension cords rated for outdoor use. Buy one spare strand and a pack of spare bulbs with the rest, because a single dead section in mid-December is hard to match if the store has sold out of your exact type. If you are torn between warm white and multicolor, buy warm white for the house and save the colors for a tree or the bushes, where they look joyful instead of harsh. Keep every connection in a weatherproof outlet cover or a plastic connection box, about $8 to $12, so rain cannot get into the plugs. Today is November 21, which leaves plenty of time to hang lights on a dry weekend before the cold sets in.
Safety is not optional with outdoor lights. Use only lights rated for outdoor use, keep every connection off the ground and out of puddles, and never run an indoor extension cord outside. A ladder, a helper to hold it and a dry day are the minimum for any roofline work. If the forecast turns wet halfway through the job, stop and come back when it is dry — wet ladders and wet wiring are a bad combination, and the lights will wait. Before you hang anything, plug every strand in on the ground and check that all the bulbs work — finding a dead section after it is on the roof means taking it all down again. At the end of the season, coil each strand loosely, label the bag with where it goes, and store the clips in a separate box so nothing tangles. The 12 ideas below start simple and get more ambitious, and most can be combined: a roofline, a lit walkway and one glowing tree make a complete display on their own.
1. Classic warm white roofline

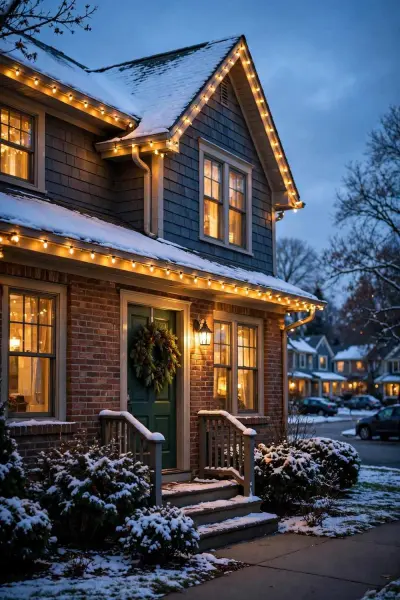
The roofline is the single most effective place for outdoor lights, because it outlines the whole house. Use C9 or C7 LED bulbs in warm white — C9 bulbs are larger and read well from the street, while C7 are smaller and neater on a modest house. Clip the strand to the gutters or shingles with plastic light clips, about $5 for a pack of 50, spacing the bulbs about 12 inches apart. A typical single-story house needs 60 to 100 feet of lights, which costs roughly $25 to $40 in LED strands.
Work on a dry day with a helper holding the ladder, and hang the lights before the first hard frost so the clips grip properly. Start at the outlet end and work away from it, keeping the strand taut but not stretched. Warm white is the safest color choice: it suits every house style, looks good with a wreath on the door and never clashes with the neighbors. If you only do one thing from this list, do this one — it is the display people remember.
2. A multicolor tree wrap

Wrapping a front-yard tree in multicolor lights is the most joyful display you can put up, and it is easier than it looks. Start at the bottom of the trunk and wind the strand upward in a loose spiral, spacing the wraps about 18 inches apart, then work the branches from the inside out so the light glows from within the tree. A 6 to 8 foot tree takes about 200 to 300 mini lights, roughly two 100-count strands at $6 to $10 each. Use a long-handled hook or a pole to reach the higher branches instead of climbing the tree.
Multicolor lights suit a tree better than the house, because the green branches soften the colors and stop them looking harsh. Keep the strands the same type — mixing old incandescent and new LED strands on one tree gives uneven brightness and can overload a circuit. Plug the tree into its own outlet or a separate extension cord so you can switch it off independently. This is a great project for a family afternoon, and children love helping wind the lower branches.
3. Icicle lights on the eaves

Icicle lights hang in uneven drops from the eaves and look like frozen water catching the light. They work best on a house with a clear, straight eave line and a dark background, such as a brick wall or a deep blue evening sky. A 9-foot strand costs about $10 to $15, and most houses need three or four strands for the front eaves. Hang them with the same gutter clips as a roofline, and let the drops hang freely — if you stretch the strand, the icicle effect disappears.
Cool white icicles look the most like real ice, while warm white gives a softer, cozier glow. Pick one and use it on every eave so the display reads as a single design. Icicles tangle easily in storage, so coil each strand loosely around your forearm and store it in its own bag or box at the end of the season. Avoid hanging them over a walkway where dripping water or falling ice could land on visitors, and check the drops each year for cracked bulbs before you hang them.
4. A luminaria pathway

A lit pathway is the most welcoming thing you can add to a front yard, and it guides visitors safely to the door on dark December evenings. The simplest version is a set of candy cane pathway lights — a set of 8 to 10 stakes costs about $15 to $25 — pushed into the ground along both sides of the walk. For a warmer look, make luminarias: fold the top of a brown paper bag over, put two inches of sand in the bottom, and set a battery tea light inside. Ten bags cost about $3, and the glow is lovely.
Paper luminarias need dry weather, so keep them for a clear evening or a party night rather than all month. The candy cane stakes are weatherproof and can stay out all season. Space the lights about 2 feet apart and keep them low, no more than 18 inches high, so they light the path without blinding anyone. Plug them into the same timer as the rest of the display so the whole yard comes on together at dusk.
5. Net lights on bushes

Net lights are the fastest way to light a bush or shrub: unfold the net, drape it over the bush and plug it in. A 4 by 6 foot net costs about $12 to $18 and covers most foundation shrubs. They give an even, twinkling blanket of light that looks far more professional than winding a single strand around a bush by hand, and they take about two minutes per bush to install.
Measure your bushes before you buy, because a net that is too small leaves bare patches and a net that is too big sags onto the ground. Warm white nets look best on green shrubs, while multicolor nets suit a bare winter shrub. Tuck the plug and the end of the strand under the bush so it stays dry, and connect several nets with outdoor-rated extension cords rather than running a new cord to each one. Net lights are the best first project if you have never put up outdoor lights before.
6. A reindeer and sleigh display

A wireframe reindeer and sleigh is the classic yard figure, and a lit one turns a plain lawn into a scene. A three-piece set — Santa, sleigh and one or two reindeer — costs about $60 to $120 depending on size, and the pieces stake into the ground with the included pegs. Place the set where it can be seen from the street but not blocking the walkway, usually near the front corner of the yard, and run the cord along the ground to the nearest outlet.
Anchor the figures well: a winter storm will knock over an unpegged reindeer, and a fallen display looks worse than no display at all. Use landscape staples or tent pegs in addition to the supplied stakes if your soil is soft. Keep the set on its own circuit or timer so you can switch it off without killing the house lights. If you buy one piece a year, start with the sleigh and add a reindeer each Christmas until the scene is complete.
7. Window outlines

Outlining the front windows with lights frames the house from the inside out, and it looks wonderful from the street. Use a single strand per window, attached with suction-cup hooks on the glass or small adhesive clips on the frame, and hang a lit wreath in the middle of the largest window. A 25-foot strand is enough for two average windows, and the whole project costs under $25.
Keep the outline neat: measure each window and cut the strand to length, or fold the excess back along the frame so there is no sagging loop at the corner. Warm white works best here, because colored lights on a window can look busy from inside the house. If you have curtains, keep them tied back on the sides so the wreath is visible. Window outlines are a good choice for renters, since nothing is nailed or screwed into the house.
8. Solar-powered lights

Solar lights need no outlet, no extension cord and no electricity bill, which makes them ideal for fences, driveways and far corners of the yard. A solar string of 100 LEDs costs about $12 to $20, and the small panel charges during the day and switches the lights on automatically at dusk. Place the panel where it gets at least six hours of direct sun — a south-facing spot is best — and keep it clear of snow.
Solar lights are dimmer than plug-in LEDs and they fade on cloudy days, so use them as an accent rather than the main display: along a fence, around a mailbox or down a garden path. In northern areas with short winter days, expect about 4 to 6 hours of light per night. They are the cheapest lights to run and the easiest to install, and they are a good option if your outdoor outlets are already full.
9. A light projector

A light projector throws snowflakes, stars or falling snow across the front of your house, and it takes about five minutes to set up. Stake the projector in the ground about 10 to 20 feet from the house, aim it at the wall, and plug it in. A decent projector costs $25 to $50, covers up to 2,000 square feet and uses very little power. It is the fastest way to light a large house.
Projectors work best on a plain wall with no windows in the way, and they look better in the dark than at dusk. Keep the lens clean — a dirty lens blurs the pattern — and angle it slightly upward so the snowflakes land on the wall rather than the lawn. Do not point a projector at the road or at a neighbor's window, and check local rules if you live on a busy street. Pair a projector with a simple roofline and you have a complete display for under $75.
10. A lit door garland

The front door deserves its own lights. Wrap a 6-foot artificial garland with a 50-count warm white strand, then hang it around the door frame with adhesive hooks or a door-frame garland hanger — about $10 to $15 for the hanger, and it leaves no holes. Add a lit wreath in the center of the door, and the entrance is finished. The whole project costs about $30 to $40 and takes twenty minutes.
Artificial garland is better than fresh for a door, because fresh garland dries out and sheds needles on the step. Fluff the garland before you hang it, and wind the lights from the inside out so the bulbs sit in the branches rather than on top of them. Use a battery-operated strand if there is no outlet near the door, and keep a spare set of batteries for December. A lit door garland is the one display every visitor actually sees up close, so it is worth the effort.
11. A wrapped yard tree

Wrapping a tall yard tree in warm white lights turns it into a beacon for the whole street. Start at the base of the trunk and wind upward in a spiral, keeping the wraps about 2 feet apart, then light the lower branches with a second strand. A 15-foot tree takes about 400 to 600 lights, roughly four to six 100-count strands at $6 to $10 each. Use a light-hanging pole, about $20, to reach the branches without a ladder.
Warm white is the right color for a yard tree, because it looks like moonlight and suits the snow. Do the work on a calm, dry day — wind makes a ladder dangerous and tangles the strands. Leave the lights up through January if you like; the tree looks just as good in the new year. This is the most impressive single display on this list, and it needs no other decoration in the yard.
12. Smart timers and controls

A timer is the least glamorous part of an outdoor display and the one that saves the most money. An outdoor digital timer costs $12 to $20, plugs into the outlet, and switches the lights on at dusk and off at a set time — 10 or 11 pm is a good cutoff. A smart plug, about $15 to $25, does the same thing from a phone app and lets you turn the lights on early if guests are coming.
Put every outdoor light on one timer or one smart plug, and use a single outdoor-rated power strip or a multi-outlet stake to connect the strands. Never overload one outlet: add up the watts on the light boxes and keep the total under 80 percent of the circuit rating, which is about 1,440 watts on a standard 15-amp outdoor circuit. LEDs use so little power that most displays stay well under that limit. A timer also keeps the neighbors happy, because the lights go off at a reasonable hour every night.
Frequently asked questions
How many lights do I need for a house?
A typical single-story house needs 60 to 100 feet of roofline lights plus a few strands for the door and bushes. Measure each run first and add about 10 percent extra for slack.
Are LED Christmas lights better than incandescent?
Yes. LEDs use far less electricity, stay cool to the touch and last many seasons. They cost slightly more up front and save money over the life of the lights.
How do I hang lights without damaging the house?
Use plastic gutter clips or adhesive hooks made for outdoor lights. Never use nails, screws or staples, which damage shingles and siding and can nick the wires.
When should I put outdoor lights up?
Hang them on a dry weekend in late November, before the first hard frost. Today is November 21, so this weekend is a good time to start.
Can I leave outdoor lights on all night?
It is better to use a timer and switch them off around 10 or 11 pm. That saves electricity, extends the life of the bulbs and keeps the neighbors happy.
What do I do if a section of lights goes out?
Check the fuse in the plug first, then look for a loose or burnt bulb. With LEDs, one bad bulb rarely kills the whole strand, so the fault is usually at the plug or a connection.
Save these ideas for later
Pin this article so it is easy to find when you are ready to start.
Save to Pinterest